通过broadcast Intent机制可以将一个Intent发送给任何对这个Intent感兴趣的BroadcastReceiver。

通过new Intent(ACTION_1)新建Action为ACTION_1的Intent。
通过sendBroadcast(intent)将这个intent进行广播。代码如下
ActivityMain代码:
1: package com.eoeandroid.broadcastReceiver;
2: import android.app.NotificationManager;
3: import android.content.BroadcastReceiver;
4: import android.content.Context;
5: import android.content.Intent;
6: public class EoeAndroidReceiver2 extends BroadcastReceiver {
7: Context context;
8: @Override
9: public void onReceive(Context context, Intent intent) {
10: // TODO Auto-generated method stub
11: this.context = context;
12: DeleteNotification();
13: }
14: private void DeleteNotification() {
15: NotificationManager notificationManager = (NotificationManager) context
16: .getSystemService(android.content.Context.NOTIFICATION_SERVICE);
17: notificationManager.cancel(EoeAndroidReceiver1.NOTIFICATION_ID);
18:
19: }
20: }
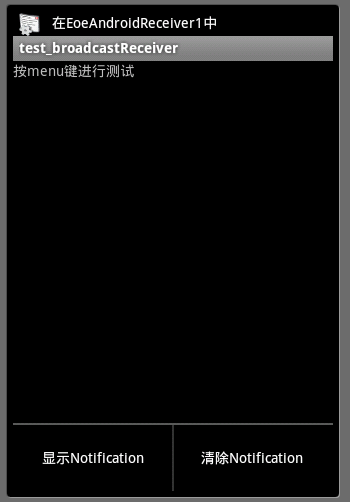
当单击MENU的第一项后,程序执行到EoeAndroidReceiver1,通过OnRecievie方法将一个Notification显示在了状态栏中。其中showNotification()负责显示一个Notification。代码如下:
EoeAndroidReceiver1代码
<style type="text/css">
<!--
.csharpcode, .csharpcode pre
{font-size:small;
color:black;
font-family:consolas,"Courier New",courier,monospace;
background-color:#ffffff}
.csharpcode pre
{margin:0em}
.csharpcode .rem
{color:#008000}
.csharpcode .kwrd
{color:#0000ff}
.csharpcode .str
{color:#006080}
.csharpcode .op
{color:#0000c0}
.csharpcode .preproc
{color:#cc6633}
.csharpcode .asp
{background-color:#ffff00}
.csharpcode .html
{color:#800000}
.csharpcode .attr
{color:#ff0000}
.csharpcode .alt
{background-color:#f4f4f4;
width:100%;
margin:0em}
.csharpcode .lnum
{color:#606060}
-->
</style>
1: package com.eoeandroid.broadcastReceiver;
2: import android.app.Notification;
3: import android.app.NotificationManager;
4: import android.app.PendingIntent;
5: import android.content.BroadcastReceiver;
6: import android.content.Context;
7: import android.content.Intent;
8: public class EoeAndroidReceiver1 extends BroadcastReceiver {
9: Context context;
10: public static int NOTIFICATION_ID = 21321;
11: @Override
12: public void onReceive(Context context, Intent intent) {
13: this.context = context;
14: showNotification();
15: }
16: private void showNotification() {
17: NotificationManager notificationManager = (NotificationManager) context
18: .getSystemService(android.content.Context.NOTIFICATION_SERVICE);
19: Notification notification = new Notification(R.drawable.icon,
20: "在EoeAndroidReceiver1中", System.currentTimeMillis());
21: PendingIntent contentIntent = PendingIntent.getActivity(context, 0,
22: new Intent(context, ActivityMain.class), 0);
23: notification.setLatestEventInfo(context, "在EoeAndroidReceiver1中", null,
24: contentIntent);
25: notificationManager.notify(NOTIFICATION_ID, notification);
26: }
27: }
<style type="text/css">
<!--
.csharpcode, .csharpcode pre
{font-size:small;
color:black;
font-family:consolas,"Courier New",courier,monospace;
background-color:#ffffff}
.csharpcode pre
{margin:0em}
.csharpcode .rem
{color:#008000}
.csharpcode .kwrd
{color:#0000ff}
.csharpcode .str
{color:#006080}
.csharpcode .op
{color:#0000c0}
.csharpcode .preproc
{color:#cc6633}
.csharpcode .asp
{background-color:#ffff00}
.csharpcode .html
{color:#800000}
.csharpcode .attr
{color:#ff0000}
.csharpcode .alt
{background-color:#f4f4f4;
width:100%;
margin:0em}
.csharpcode .lnum
{color:#606060}
-->
</style>
单击第二个按钮后程序开始广播,这个广播被EoeAndroidReceiver2截获然后开始执行EoeAndroidReceiver2里的OnReceive方法,其中DeleteNotification()方法负责将刚才生成的Notification从状态栏中删除。代码如下:
EoeAndroidReceiver2代码
1: package com.eoeandroid.broadcastReceiver;
2: import android.app.NotificationManager;
3: import android.content.BroadcastReceiver;
4: import android.content.Context;
5: import android.content.Intent;
6: public class EoeAndroidReceiver2 extends BroadcastReceiver {
7: Context context;
8: @Override
9: public void onReceive(Context context, Intent intent) {
10: // TODO Auto-generated method stub
11: this.context = context;
12: DeleteNotification();
13: }
14: private void DeleteNotification() {
15: NotificationManager notificationManager = (NotificationManager) context
16: .getSystemService(android.content.Context.NOTIFICATION_SERVICE);
17: notificationManager.cancel(EoeAndroidReceiver1.NOTIFICATION_ID);
18: }
19: }
<style type="text/css">
<!--
.csharpcode, .csharpcode pre
{font-size:small;
color:black;
font-family:consolas,"Courier New",courier,monospace;
background-color:#ffffff}
.csharpcode pre
{margin:0em}
.csharpcode .rem
{color:#008000}
.csharpcode .kwrd
{color:#0000ff}
.csharpcode .str
{color:#006080}
.csharpcode .op
{color:#0000c0}
.csharpcode .preproc
{color:#cc6633}
.csharpcode .asp
{background-color:#ffff00}
.csharpcode .html
{color:#800000}
.csharpcode .attr
{color:#ff0000}
.csharpcode .alt
{background-color:#f4f4f4;
width:100%;
margin:0em}
.csharpcode .lnum
{color:#606060}
-->
</style>


相关推荐
android整合--intent
android intent
Android-Intent详解
DeepSignals- Predicting Intent of Drivers Through Visual Signals
android intent和intent action大全
DeepSignals- Predicting Intent of Drivers Through Visual Signals
ZX-Android-Intent详解 让你更快了解
个人整理的Android Intent的使用介绍 Android 组件之间的信使Intent Android 中的数据存取和ContentProvider
android各组件详解- Intent.
android 网格组件9宫格,GridView展示数据 3*3排列显示。鼠标点击其中一个网格 会触发事件,并传递参数
Android 广播大全 Intent Action 事件.
Fluent API for common Intent use-cases in Android. This library wraps Intents with a clean and simple to understand interface for a number of specific use-cases. Sample usage See the sample project in...
033集-通过Intent传递数据视频教材,不错的哦。
Android Intent 学习笔记
Android 广播事件 Intent Action 大全
React本机接收共享意图 一个React Native插件,使React Native应用程序能够从另一个应用程序接收共享的照片,视频,文本,URL或任何其他文件类型。 此外,还支持iOS Share扩展并... 注意: Ios and Android on Debb
Android-Intent使用方法详解 配合(http://blog.csdn.net/daiyibo123/article/details/51227160)博客查看。使用Android stdio编写。
React Native Android模块使用Android的Intent操作将文本发送到可共享的应用程序或拨打电话或打开第三方应用程序。 当您需要在Android设备中的应用之间共享一些文本,并且如果您有有效的电话号码直接拨打电话(如果...
android系统广播大全 Intent跳转界面
Java项目:在Android中使用Model-View-Intent(MVI)架构模式下对Kotlin协程的性能分析